
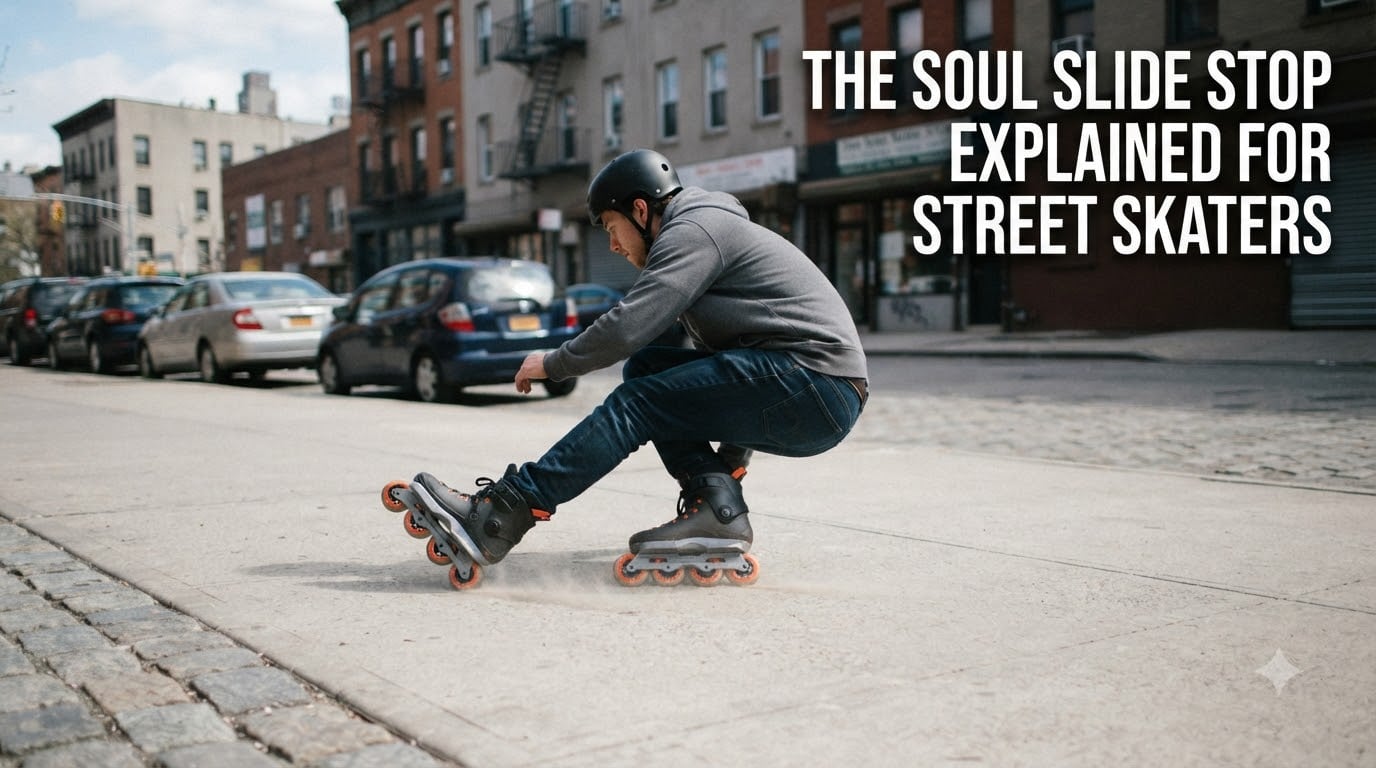
If you skate through city streets, you already know that stopping is the real skill. Anyone can roll forward. The soul slide stop explained for street skaters is something different — it is a controlled, sideways sliding stop that bleeds off speed without needing a long runway or a wide road.
I have spent years watching skaters struggle with braking on narrow sidewalks and steep urban hills. The heel brake works fine on flat bike paths, but the moment you hit a downhill with pedestrians on both sides, you need something better. That something is the soul slide.
In this guide, we will cover exactly what the soul slide is, why it matters for street skating, a full step-by-step technique breakdown, the most common mistakes skaters make, how it compares to the T-stop and drag stop, and a realistic practice progression. Whether you are coming from a T-stop background or just learning to brake beyond the heel pad, you will have a clear roadmap by the end.
Table of Contents
What Is a Soul Slide?
The soul slide is an inline skating stopping technique where you push the heel of your front foot outward while keeping your feet parallel, letting the side of your boot slide against the ground until you slow or stop. Unlike the T-stop, where one wheel rolls behind you, the soul slide uses the side of your frame and wheels to create friction across a wider contact patch.
Think of it as a controlled sideslip. You are not rolling on the wheels — you are sliding on the edges. The motion is similar to how a snowboarder skids sideways to scrub speed, just translated onto eight wheels.
The name “soul slide” comes from the aggressive skate trick called a soul grind, where the side of the boot (the “soul” area) rests on a ledge. In the stopping version, that same side-of-boot contact is what creates the braking friction.
For street skaters, the soul slide fills a specific gap: it works on surfaces and in spaces where other stops fall short. It is one of the most versatile tools you can add to your braking toolkit.
Why Street Skaters Need the Soul Slide Stop
Street skating throws conditions at you that rink skating never will. Narrow sidewalks, sudden intersections, gravel patches, steep descents, and unpredictable pedestrians all demand a stop that is fast, compact, and reliable.
The soul slide shines in exactly these scenarios. Here is why it belongs in every street skater’s arsenal.
It Works on Narrow Paths
A T-stop needs trailing space behind you. On a crowded sidewalk or a narrow bike path, that space is not always there. The soul slide happens between your feet, in your own footprint. You can stop on a strip of pavement barely wider than your stance.
Reddit users in the rollerblading community consistently highlight this advantage. One popular thread demonstrates the soul slide being used on a sidewalk where a T-stop would clip curbs or pedestrians.
It Handles Downhill Speed
When you are descending a hill and picking up speed fast, rolling stops like the T-stop can overheat your wheels and lose effectiveness. The soul slide spreads friction across the side of multiple wheels, giving you more consistent braking power over longer descents.
You can also modulate it — apply light pressure to scrub a little speed, or commit harder for a full stop. That modulation is what makes it valuable for downhill street skating.
It Is a Genuine Emergency Stop
If a car pulls out, a dog runs into your path, or a pedestrian steps off a curb without looking, you need to stop now. The soul slide can bring you to a halt quickly without needing to spin around or change direction dramatically.
It keeps you facing forward, so you maintain awareness of the obstacle you are avoiding. That forward-facing orientation matters when you are navigating traffic.
The Soul Slide Stop Explained for Street Skaters: Step-by-Step Technique
Here is the full breakdown of how to execute a soul slide. Read through all the steps before you try it, then practice each phase separately before linking them together.
Step 1: Build Your Glide Speed
Start by rolling at a comfortable, moderate speed — fast enough to maintain balance, slow enough that a mistake will not send you flying. A light skating glide is perfect. You want momentum because sliding requires it; standing still, there is nothing to slide.
Get into a stable parallel stance with your knees slightly bent and your weight centered. This is your home base.
Step 2: Transfer Weight to the Back Foot
Shift most of your body weight onto your back foot. This foot will stay rolling straight — it is your anchor. Your back skate tracks in the direction of travel, keeping you stable while the front foot does the work.
You want roughly 70 to 80 percent of your weight on the back foot. This frees up the front foot to move without throwing off your balance.
Step 3: Push the Front Heel Outward
Now the key motion: push the heel of your front foot outward, away from your body. Rotate the front foot so the wheels turn perpendicular to your direction of travel. The side of the front frame and wheels is now what contacts the ground.
This is where the slide happens. The friction between the side of your wheels and the pavement is what slows you down. Keep the front knee bent and flexible — a stiff leg will skip and chatter instead of sliding smoothly.
Step 4: Control the Slide Angle
The angle of your front foot determines how aggressively you brake. A slight angle creates gentle speed control. A sharper angle, closer to 90 degrees to your travel direction, creates a harder stop.
Start with a shallow angle. As you get comfortable with the feeling of sliding, gradually increase the angle to brake harder. The goal is smooth, controlled friction — not a sudden lock-up.
Step 5: Keep Your Shoulders Facing Forward
Your upper body should stay facing the direction of travel throughout the slide. If your shoulders rotate with the front foot, you will spiral and lose control. Keep your chest and hips oriented forward while only the front foot rotates.
This is one of the most counterintuitive parts of the technique. Your legs are doing something sideways while your torso stays straight. It takes practice, but it is what makes the stop stable.
Step 6: Bring the Front Foot Back and Roll Away
Once you have scrubbed enough speed, smoothly pull the front foot back into a parallel position. Transfer your weight evenly back across both feet and roll away clean.
Do not snap the foot back — ease it in. A jerky return can catch an edge and send you off balance. The recovery should feel like the slide in reverse.
Common Mistakes and How to Fix Them
Every skater runs into the same handful of problems when learning the soul slide. The good news is that each one has a straightforward fix once you understand what is going wrong.
Mistake 1: Weight Too Far Forward
If you feel the front foot catch, skip, or suddenly stop instead of sliding, your weight is probably too far forward. When you lean onto the sliding foot, you push it into the ground too hard and it grips instead of slides.
The fix: deliberately sit back. Put more weight on the back foot than feels natural at first. You should be able to lift the toes of your front foot inside the boot.
Mistake 2: Stiff Front Leg
A locked front knee causes the wheels to chatter and grab. The slide becomes a series of jerky hops instead of one smooth skid.
The fix: think of your front knee as a shock absorber. Keep it soft and bent. Let it absorb the vibration of the slide the way a car suspension absorbs bumps.
Mistake 3: Rotating the Shoulders
If you keep spinning past the slide and end up turning in circles, your upper body is following your front foot. The rotation transfers up from your leg through your hips and chest.
The fix: pick a point in front of you and stare at it. Lock your gaze forward. This naturally keeps your shoulders square and prevents the unwanted rotation.
Mistake 4: Sliding on Too Rough a Surface
Rough asphalt, chip seal, and gravel make the soul slide much harder. The wheels grab on every pebble instead of gliding. Many skaters blame their technique when the surface is actually the problem.
The fix: learn on smooth concrete first — a painted basketball court or a parking garage with polished floors. Once the technique is dialed in, you can adapt to rougher street surfaces.
Mistake 5: Going Too Slow
This sounds counterintuitive, but sliding requires momentum. If you try to soul slide at walking speed, the wheels will just stick and you will stumble. You need enough speed for the wheels to break traction and slide.
The fix: build a bit more speed before initiating the slide. You are not going to crash — the slide itself slows you down. Trust the physics.
Soul Slide vs T-Stop vs Drag Stop
Skaters often ask which stopping method they should learn. The honest answer is that you need more than one — each stop has strengths and weaknesses depending on the situation. Here is how the three most common street stops compare.
The T-Stop (Drag Stop)
The T-stop involves lifting one foot and dragging the wheels of that foot behind you, perpendicular to your rolling foot. It is the most widely taught stop after the heel brake.
Strengths: easy to learn, works at any speed, keeps you facing forward, and requires minimal flexibility. Most street skaters use this as their daily braking method.
Weaknesses: it eats wheels quickly because all the friction concentrates on a few wheels. It also needs space behind you, which is not always available on narrow paths.
The Drag Stop
The drag stop is a broader term that includes any technique where you drag a wheel or skate edge to create friction. The T-stop is technically a type of drag stop, but skaters often use the term to describe dragging the inside edge of one skate at an angle.
Strengths: very intuitive and natural feeling. Most skaters discover some version of it on their own. It is gentle and controllable.
Weaknesses: it is slower to stop you than a soul slide or powerslide. In a true emergency, the drag stop may not bleed speed fast enough.
The Soul Slide
The soul slide brings the sliding foot to the front and rotates it sideways, rather than dragging behind. This creates a wider friction patch and a more aggressive stop.
Strengths: works in narrow spaces, stops you faster than a T-stop, and spreads wear across more wheels. It is also the gateway technique to more advanced slides like the magic slide and parallel slide.
Weaknesses: it requires more flexibility and balance than a T-stop. The twisted stance feels unnatural at first, and there is a steeper learning curve.
Which Should You Learn First?
If you are a beginner, start with the heel brake, then learn the T-stop. Once the T-stop feels automatic, begin working on the soul slide. Trying to learn the soul slide before you have basic one-foot balance and weight transfer skills will frustrate you.
The progression most experienced skaters recommend is: heel brake, then T-stop, then soul slide, then magic slide, then parallel slide. Each stop builds the skills you need for the next one.
Flexibility Issues and Modifications
The number one complaint about the soul slide on forums like Reddit is that it feels like contortion. Skaters say their hips and ankles will not rotate enough to get the front foot sideways while keeping the back foot straight.
This is a real barrier, especially for adult learners and anyone with limited hip mobility. But it is not a dead end — there are modifications that make the soul slide accessible to almost everyone.
Why It Feels Like Contortion
The soul slide asks your hips to do two opposing things at once: the back leg stays forward-facing while the front leg rotates outward. If your hips are tight from sitting at a desk all day, this position genuinely feels impossible.
You are not doing it wrong — your body just needs time to adapt. Almost no one nails the full rotation on day one.
Modification 1: Use a Shallower Angle
You do not need a full 90-degree rotation to get braking effect. Even a 45-degree angle creates meaningful friction. Start with a shallow angle that your hips can handle comfortably, and gradually increase it over weeks as your mobility improves.
A shallow soul slide at 30 to 45 degrees is still a useful stop. It will not brake as hard as a full-angle slide, but it works for everyday speed control.
Modification 2: Open Your Stance
Instead of keeping your feet close together, widen your stance. A wider base gives your front foot more room to rotate without forcing your hips into an extreme position.
This is not a crutch — many experienced skaters use a wider stance for the soul slide because it is more stable. Find the width that lets you rotate without pain.
Modification 3: Stretch Regularly
If flexibility is the barrier, address it directly. Hip openers, deep squats, and ankle mobility drills will all help. Even ten minutes of stretching after skating sessions makes a measurable difference over a few weeks.
You do not need to be a yogi. You just need enough range of motion to rotate one foot outward while maintaining balance on the other.
Practice Progressions for Beginners
The soul slide is not something you learn in one session. It is built in layers, with each drill developing a specific skill. Here is a progression path that takes you from zero to a functional soul slide.
Phase 1: Master One-Foot Glides
Before you can soul slide, you need to be comfortable gliding on one foot for at least five seconds. If you cannot balance on your back foot alone, you will not be able to free up the front foot to slide.
Practice lifting one foot while rolling and gliding on the other. Switch feet. Do this until it feels boring and easy — that is when you are ready to move on.
Phase 2: Practice the Heel Push on Grass
Stand on grass (so your wheels do not roll) and practice the soul slide motion statically. Shift weight to the back foot, push the front heel outward, and feel the twisted stance. This builds muscle memory without the added challenge of sliding.
Spend a full session just doing this. It looks silly, but it trains the exact position you need on pavement.
Phase 3: Initiate the Slide at Low Speed
Find a smooth, flat surface with nobody around — an empty parking garage or a closed basketball court works perfectly. Build a small amount of speed and try initiating the slide with a very shallow angle.
Do not try to stop. Just try to feel the wheels break traction and slide even slightly. The goal of this phase is to experience the sliding sensation without fear.
Phase 4: Gradually Increase the Angle
Once the shallow slide feels natural, start increasing the angle of your front foot. Each session, push the heel a little further out. You will notice the braking power increase as the angle gets steeper.
This is also when you start practicing the recovery — pulling the front foot back to parallel and rolling away clean.
Phase 5: Take It to the Street
Only after you can reliably initiate, hold, and recover the slide on smooth flat ground should you take it into real street conditions. Start with gentle hills and wide paths before attempting narrow sidewalks and steep descents.
The technique does not change on the street, but the consequences do. Having the muscle memory dialed in means you can focus on your surroundings instead of your feet.
Frequently Asked Questions
What is a soul slide on inline skates?
The soul slide is an inline skating stop where you push the heel of your front foot outward while keeping your feet parallel, sliding the side of your boot and wheels against the ground to slow down or stop.
How do skaters brake on inline skates?
Skaters brake using several methods: the heel brake pad, the T-stop (dragging one foot behind), the powerslide, the plough stop, and the soul slide. Street skaters typically use a combination depending on speed, space, and terrain.
Is the soul slide harder than the T-stop?
Yes, the soul slide is harder to learn than the T-stop because it requires more hip flexibility, one-foot balance, and comfort with sliding. Most skaters learn the T-stop first and progress to the soul slide later.
Can I learn the soul slide if I am not flexible?
Yes. Start with a shallower front-foot angle, widen your stance, and stretch your hips and ankles regularly. You do not need a full 90-degree rotation to get effective braking from a soul slide.
Is the soul slide a good emergency stop?
Yes, the soul slide is an effective emergency stop for street skaters because it works in narrow spaces, keeps you facing forward, and can bring you to a halt quickly without needing room behind you.
Conclusion
The soul slide stop explained for street skaters comes down to one core idea: shifting your weight back, rotating your front foot sideways, and letting the wheels slide to scrub speed. It is not the easiest stop to learn, but it is one of the most useful for real-world street skating.
Start with one-foot glides, practice the stance on grass, and build up slowly on smooth flat ground. Address your flexibility honestly, use a wider stance if you need to, and take the progression at your own pace. The soul slide rewards patience — and once it clicks, it transforms how confidently you skate in traffic, on hills, and on narrow paths.
Your next step: grab your skates, find a smooth empty surface, and start with Phase 1 of the practice progression. The slide is waiting.