
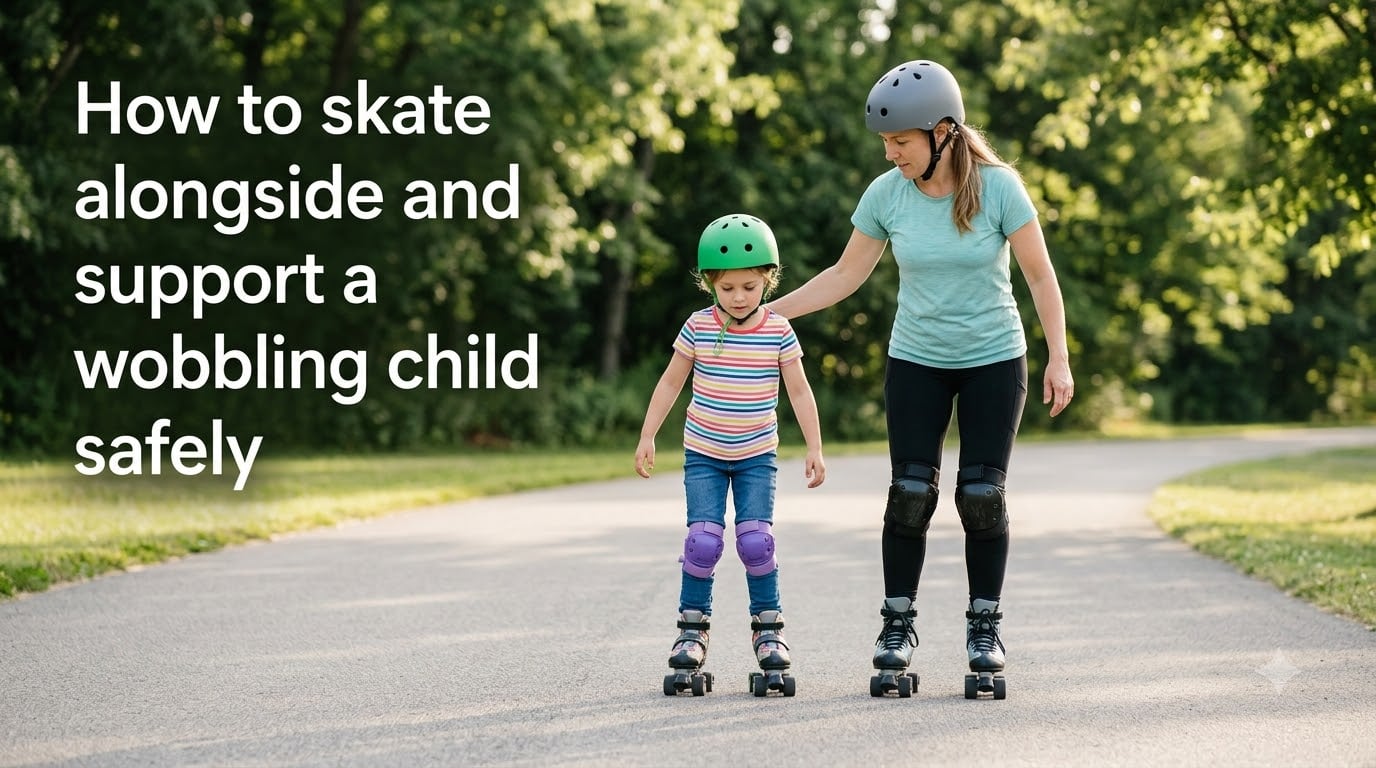
The safest way to skate alongside and support a wobbling child is to stand at their side, slightly behind, with one hand resting gently on their shoulder or upper arm while you keep your own weight centered and knees bent. This position lets you steady them the instant they lose balance without pulling them off-center or blocking their forward view. You stay close enough to catch them, far enough to let their body learn the small corrections it needs.
Every parent who has laced up skates next to a shaky four-year-old knows that wobble. The ankles bend inward, the arms pinwheel, and the smile flips to panic in half a second. You want to grab them, but grabbing too hard can cause the very fall you are trying to prevent.
I have taught my own two kids to skate on the same cracked driveway where I learned, and I have spent hundreds of hours at rinks watching other parents figure this out. What follows is everything I have learned about how to skate alongside and support a wobbling child safely — from hand placement to positioning, from when to hold tighter to when to finally let go.
Table of Contents
How to Skate Alongside and Support a Wobbling Child Safely?
The technique comes down to three things: where you stand, where your hands go, and how stable you keep your own body. Get those three right and the rest follows.
Before you ever roll, make sure both of you are in full protective gear. That means helmets, knee pads, wrist guards, and elbow pads at minimum. I will cover gear in detail below, but gear is non-negotiable because even with perfect support, a wobbly child will fall. The goal is to make every fall harmless.
Positioning: Where to Stand Relative to the Child
Your position is the single most important variable. Stand at the child’s side, roughly half a step behind them, so your hips line up with their shoulder. This is the support zone.
From this position you can see their face (to read panic before it becomes a fall), you can reach their torso in one quick motion, and your skates will not tangle with theirs if they drift sideways.
Avoid three positions that parents naturally drift into:
Directly in front of the child. It feels protective, but you cannot see their body language, and if they roll forward into you, both of you go down.
Directly behind. You can push them forward accidentally, and you cannot reach their arms or chest if they tip sideways.
On the child’s weak side. If your child is right-handed, stand on their left — most wobbles and reflexive grabs go toward the dominant side. Being on the non-dominant side lets you catch the unexpected direction.
Stay close enough that your elbow can brush theirs. That contact distance — about 8 to 12 inches — is the sweet spot for a quick catch without crowding them.
Hand Placement and Physical Support Techniques
How you touch a wobbling child matters as much as where you stand. The wrong grip can yank their shoulder, twist their wrist, or pull them off-balance in the opposite direction. Here are the four techniques I rotate through depending on how shaky the child is at that moment.
1. The Shoulder Rest (for mild wobbles)
Place your hand lightly on top of their shoulder, fingers relaxed, palm down. Do not grip. The hand is there to give them a reference point — a sense that you are right there — and to apply gentle downward pressure if they start to tip. This is your default position once they are rolling with any confidence.
2. The Two-Finger Cradle (for moderate wobbles)
Cup your hand under their upper arm, just above the elbow, with your thumb on the outside. Two fingers underneath, thumb on top. This gives you a firm catch point without restricting their arm movement. If they tip, you can guide them back to center rather than snatching them upright.
3. The Harness Hold (for early stages)
Stand behind and to the side, place one hand on their back between the shoulder blades, and the other under their opposite upper arm. You are essentially forming a cradle around their torso. Use this when they are first standing on skates or recovering from a confidence-shaking fall.
4. The Hand-Hold (for nervous beginners)
Have the child hold your hand palm-to-palm, fingers interlocked, with your arm extended sideways between you. Keep your elbow slightly bent so their wobbles travel through your joint rather than yanking your shoulder. Never hold both of their hands at once — it pulls their arms up, removes their natural counterbalance, and makes them more likely to tip backward.
Maintaining Your Own Balance While Supporting
This is the part almost no resource talks about, and it is the one parents ask me about most. If you are off-balance, you cannot save them.
Keep your knees softly bent at all times. A bent knee lowers your center of gravity, which means a sudden tug from the child moves your arms, not your whole body. Lock your knees and one wobble from your kid becomes two people on the ground.
Keep your skates shoulder-width apart, parallel, and staggered — one slightly ahead of the other. This staggered stance is more stable than a side-by-side stance because it gives you a front-to-back base as well as a side-to-side one.
Keep your own weight centered over your skates. When you reach for the child, hinge from the hips rather than leaning your whole torso toward them. Reaching by leaning pulls you off your skates; reaching by hinging keeps your feet planted.
Finally, keep your free hand (the one not on the child) out to your side or in front of your chest. It is your counterweight. If the child yanks your support arm, that free hand helps you stay upright.
When to Let Go: Gradual Independence Signals
Knowing when to lighten your touch is just as important as knowing how to hold on. Hold too long and the child develops dependence; let go too early and a fall shatters their confidence.
Look for these signals that they are ready for less support:
They start correcting small wobbles on their own. Their arms come out for balance naturally, their ankles self-correct, they do not freeze when they tip.
They look ahead, not down. A child staring at their skates is thinking about every movement. A child looking forward has shifted balance to autopilot.
They push your hand off. This is the clearest signal of all. Honor it.
Their stride becomes rhythmic. Choppy, fast, tiny steps mean panic. Long, even pushes mean their body has found the rhythm.
When you see these signs, lighten the shoulder rest to a single fingertip. Then hover your hand an inch above their shoulder without touching. Then drop back half a step so you are trailing rather than alongside. The transition should take days or weeks, not minutes.
Essential Safety Gear for Both Parent and Child
No amount of support skill replaces protective gear. A supported child can still fall, and a parent focused on catching a child can absolutely lose their own balance. Gear is the safety net for everyone.
Child’s Protective Equipment Checklist
Every child on skates should wear these five pieces, every single time, no exceptions:
Helmet — properly fitted, snug under the chin, sitting level on the head (not tilted back). A bike helmet works in a pinch, but a skate-specific helmet with rear coverage is better.
Knee pads — hard-shell caps that slide on impact. Soft fabric pads do not slide; they catch and twist the knee. Hard shell is non-negotiable.
Wrist guards — the most common skating injury is a broken wrist from an outstretched-arm fall. Wrist guards with a rigid splint prevent this almost entirely.
Elbow pads — less critical than knees and wrists but important for sideways falls.
Properly fitted skates — skates that are too loose cause ankle wobble (the very thing you are trying to fix). Skates should fit snugly, with the heel locked in place.
Forum parents are unanimous on this: full gear builds confidence. A child in knee pads and wrist guards falls without fear, and falling without fear is how they learn to get back up.
Why the Parent Should Also Wear Gear
I see parents at the rink all the time in sneakers, holding up a fully-padded child. Here is the problem: when you are on skates supporting a wobbling child, you are at risk of falling too. Your child’s sudden lurch can pull you off your feet, and a parent crashing down next to a child is far scarier than the child’s own tumble.
Wear your own helmet, knee pads, and wrist guards. Not only does it protect you, it models the behavior. Kids who see their parents in gear treat gear as normal rather than optional.
Best Surfaces and Locations for Practice
Where you practice is as important as how you support. The right surface forgives mistakes; the wrong surface amplifies them.
Start indoors on carpet. Carpet creates enough friction that skates barely roll, which lets the child practice standing, shifting weight, and taking small steps without building speed. This is where they learn balance before they learn movement.
Move to smooth, flat, clean pavement. Tennis courts, empty basketball courts, and sealed parking lots are ideal. Avoid asphalt with cracks, gravel, or slope. Even a gentle slope will accelerate a wobbly child faster than they can handle.
Avoid grass for actual skating. Grass is great for the very first stand-up attempts because skates will not roll at all, but rolling on grass is nearly impossible and teaches the wrong stride. Use it only for the first five minutes of day one.
Indoor rinks are excellent. The surface is perfectly smooth, the environment is controlled, and most rinks have rental skates in child sizes. The downside is crowds; pick off-peak hours for early practice.
Wherever you practice, scout the space first. Look for cracks, drains, slopes, and debris. A pebble stopped my daughter’s front wheel on her third day and the resulting fall set her confidence back a full week.
Common Mistakes to Avoid When Skating With a Child
Most parent-caused skating accidents come from a handful of well-intentioned mistakes. Here are the ones I see again and again.
Holding both of the child’s hands and pulling them forward. This is the number one mistake. It removes their ability to use arms for balance, pulls them onto their toe stops, and teaches them to lean on you rather than find their own center. If you are going to hold hands, hold one — and let them pull you, not the other way around.
Standing directly in front and walking backward. This forces you into an unstable backward-skating posture, and the child learns to skate toward a target (you) rather than learning to skate forward independently. They also cannot see your body language for cues.
Gripping too tightly. A tight grip transfers every micro-movement of your hand into their body. A tight grip also makes the child tense, and tension is the enemy of balance. Light, responsive contact is always better than a hard squeeze.
Correcting every wobble. Small wobbles are how the body learns balance. If you catch every tip, the child never develops the reflex to self-correct. Let the small ones happen; catch the big ones.
Practicing too long. Fifteen to twenty minutes is plenty for a young child. Tired legs wobble more, tired attention drifts, and fatigue-falls shake confidence. End every session while they are still having fun.
Emotional Support: Building Confidence in a Wobbling Skater
Physical technique is only half the job. The other half is what you say and how you say it. A wobbling child is often a frightened child, and fear creates stiffness, and stiffness creates worse wobbles. The loop runs both directions.
Use specific praise. “Good job” is vague; “I love how you bent your knees on that one” tells them exactly what to repeat. Name the technique you want to see more of.
Normalize falling. Say “that was a great fall!” when they go down safely. Talk about your own falls. Tell them every skater falls, and the gear is there to make it no big deal. A child who thinks falling is failure will tense up and fall worse.
Keep your voice calm and low. A sharp gasp or yell when they wobble signals danger and spikes their adrenaline. narrate what you see in a steady voice: “You’ve got it, knees bent, looking forward, nice and easy.”
Take breaks often and sit down together. Ask how they are feeling. If they say scared or tired, honor it. Pushing through fear rarely builds skills; it builds avoidance.
How to Recover When Your Child Starts to Fall?
Despite your best support, falls will happen. Your job in that split-second is not to prevent the fall but to guide it into a safe one.
If the child is tipping forward, push gently but firmly between their shoulder blades to accelerate them into a controlled drop onto knee pads. Slowing the fall partway causes the most awkward landings — either commit to catching them fully upright or guide them down fully.
If they are tipping sideways, reach across their torso and guide them down onto the padded knee and hip. Do not try to hold them up by one arm; that risks shoulder and wrist injuries.
If they are tipping backward — the most dangerous direction — get your hand behind their head immediately. A backward fall is where helmets earn their existence. Guide their hips down first, then cushion the head.
The safe-fall position for a child on skates is a low squat dropped to both knees. Teach this on carpet before you ever go outside: “If you feel yourself falling, bend your knees and drop to your pads.” Children who have practiced this drop do it automatically. Children who have not tend to stiffen and fall stiff-legged.
After every fall, celebrate the recovery. “You fell and got right back up — that is exactly what skaters do.” The fall itself is not the lesson. Getting back up is.
Frequently Asked Questions
At what age should kids learn to roller skate?
Most children are ready to start roller skating between ages 4 and 6, once they have enough balance and coordination to stand steadily on one foot. Some kids as young as 3 can try on carpet with full protective gear, but the sweet spot is around age 4 or 5 when they can follow instructions and communicate how they feel.
What is the best way to teach a kid how to roller skate?
Start with full protective gear, begin on carpet or grass where skates will not roll freely, teach the ready stance (knees bent, feet shoulder-width apart, arms out for balance), then move to smooth flat pavement. Skate alongside them at their side with a hand on their shoulder, practice 15 to 20 minutes at a time, and always end the session while they are still having fun.
How do I stop my child from wobbling on roller skates?
Wobbling comes from three sources: loose skates, stiff legs, and looking down. Check that their skates fit snugly with the heel locked in place. Teach them to keep knees softly bent so their center of gravity stays low. Remind them to look forward, not at their feet, because looking down shifts weight forward and triggers the wobble cycle.
Should I hold my child’s hand while teaching them to skate?
Hold one hand, never both. Holding both hands pulls their arms up and removes their natural balance counterweights, which actually makes wobbling worse. Hold one hand palm-to-palm with your elbow slightly bent so their movements travel through your joint. As they gain confidence, transition to a hand on their shoulder, then to hovering nearby.
Is skating good for an ADHD child?
Yes. Skating provides proprioceptive feedback, burns physical energy, and builds body awareness, all of which can benefit children with ADHD. The structured repetition of practicing skills works well with many ADHD learning styles. Keep sessions short, use clear single-step instructions, and celebrate small wins frequently.
How do I teach my child to balance on skates?
Start on carpet so the skates barely move. Have the child practice the ready stance: feet shoulder-width apart, knees bent, arms out to the sides like a tightrope walker. Once they can hold that stance for 30 seconds, practice shifting weight from one foot to the other without moving. Only add forward movement once static balance feels stable.
Wrapping Up
Learning how to skate alongside and support a wobbling child safely comes down to positioning, light touch, your own stability, and knowing when to step back. Stand at their side slightly behind, keep one hand on their shoulder, bend your knees, and let the small wobbles happen so their body can learn.
Start on carpet, move to smooth pavement, keep sessions short, and gear up every single time — both of you. The falls will come, and with the right gear and technique, every one of them becomes a lesson rather than a setback.
Your child’s first independent glide will happen faster than you think. When it does, the hours you spent hovering at their side will feel worth every second.